Tuesday, July 21, 2009

Ignite LA Tuesday Night July 21

"The first Ignite LA is tomorrow. We've got a great line-ups of talks. The topics range from social engineering to humpback whales. As always speakers will get 20 slides that auto-advance every 15 seconds."
I'm speaking on PHY2PHY. More info here.

Cinesapce
6356 Hollywood Boulevard
Los Angeles, California

6:30pm Geek Dinner starts (with drink specials from 6:30-7)
8pm-9:30 Ignite talks
10pm Cinespace opens to the general public for Dim Mak (you're welcome to stay for the band)


Tuesday, July 14, 2009

Make Controller & Application Board - First Impressions

The sad truth is that I have received report that one side of "Breath" that I shipped across the continent for a test "smoked" when turned on after it was received, and no, I was not shooting for "smoke-over-IP".

I have a love-hate relationship with Arduino. The system is really easy to get going and use, but its limitations in speed, flakey software serial port, and questionable thermal properties of its voltage regulator system always bug me. And for a project like "Breath," I have to add a bunch of other elements (Xport, Solid state relay, etc.)

Needless to say, I was a little despondent about the melt down, but then, in the midst of my preparations for hari kiri, it came to me: I bought a Making Things Make Controller 2.0 and Make Application Board 2.0 (purchased as the 
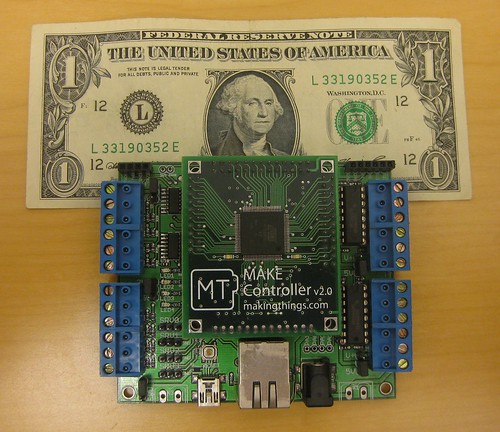
Make Controller Kit). This combo packs a good microcontroller with Ethernet and 1 Amp digital outputs, powered by 5-24V DC or USB, with four servo connectors and four on-board LEDs as well, and oh yeah a serial port.

My first day thoughts:

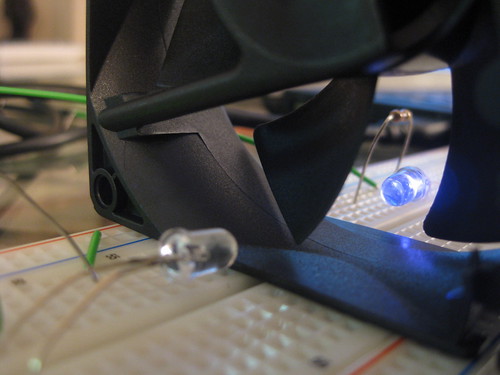
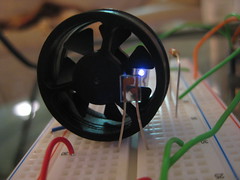
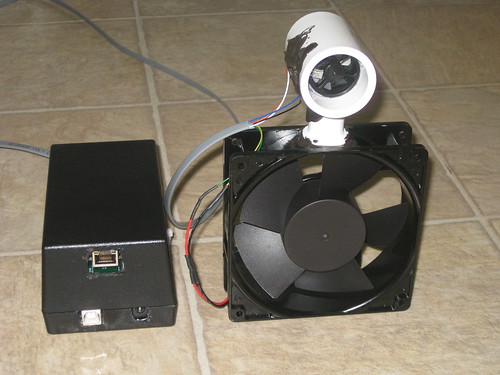
Hardware: a 10/10. Awesome stuff, all on one board, and the Ethernet appears to DHCP correctly (i.e. also grabs a gateway), and no problem with the hefty digi driver outputs driving a small 12V fan (with a 12V power supply). The size is a bit smaller than I had imagined, which is nice:


Make Controller Application Board Size

Documentation: 4/10. All the documents are there, but the organization is very confused. There are several tutorials, but you have to work through a bunch of them to get over the initial hump of understanding what is going on. Plus the two different versions of the board and the many different ways to build firmware are confusing.

So here are some things you should know:

0) Look at the Make Application Board v2.0 documentation. This will help you from going crazy since most of the documentation refers to the older version of the board. Note that the 2.0 board does not have DIP switches or a potentiometer.

1) The Make Controller 2.0 is a board that fits into the Make Application Board (or a few other boards they sell as well).

2) Out-of-the-box, the Make Controller runs firmware called "Heavy" that can do USB & Ethernet I/O and accepts Open Sound Control (OSC) commands. By the way, download the most recent version of "Heavy" as you may want to put it back on the board later after your erase it. Make Controller downloads are here.

3) mchelper is the first program you want. It will show you any Make Boards hooked up via USB, or any Make Boards it can find on the LAN (note: if you are running both wired and wireless LANs on your laptop, you may need to turn the one which your board is not on to find it, it looks like mchelper only searches one LAN). Here is a screenshot:

mchelper on OS X

4) Once you've played around with sending some OSC commands (like "/appled/0/state 1" which turns on one of the LEDs on the board), you can try to write and build your own firmware with mcbuilder. There isn't too much documentation on it, but you can think of it like the Arduino software you run on your PC to write programs and then upload them to the Arduino. I don't think you need those other "toolchains" if you aren't doing anything too bizarre. But to upload your ".bin" built files to the board, you need to first erase the board.

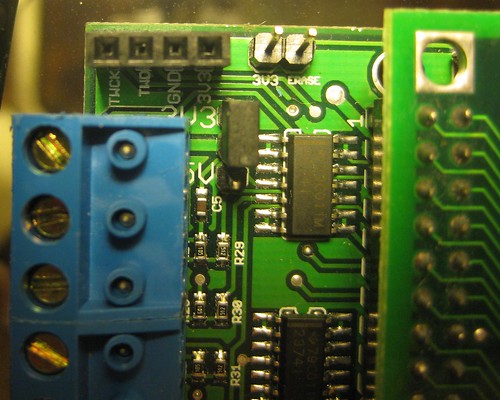
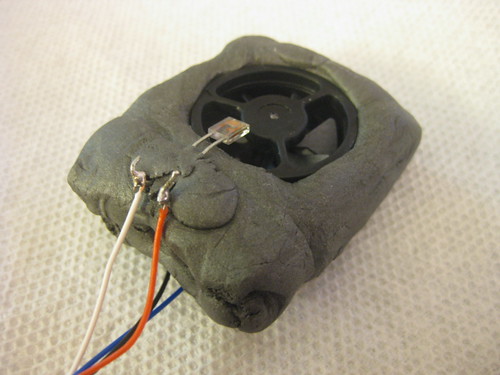
5) I can't get the erase to work with USB or Ethernet from mchelper on OS X! So after looking around, I found out there was an "erase" function on the board: you short 3.3V to "erase" on the upper left of the board, then power cycle. I went ahead and soldered in two header pins and I can short them easily that way, or hook up a pushbutton if I need to erase it often during development. See the upper middle of this photo:

Make Controller Erase

6) Once you have erased the board, you can upload your ".bin" program from either mchelper or mcbuilder.

7) mcbuilder has a small number of "examples" to get you going, much like the Arduino IDE software. For example, there is a web server example that allows you to light up the LEDs on the board through a web form.

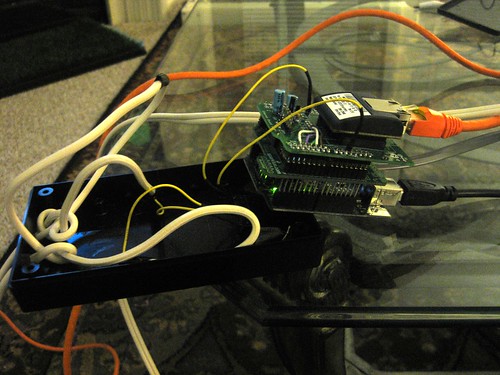
So I'm pretty happy: with "Heavy" installed right now, the board DHCPing an IP address from my wired/wireless LAN router, I can send OSC commands using mchelper over wireless through my router to the wired connection to the board, and can drive a small 12V fan with the digital outputs using the "motor" OSC commands. I think there is hope for "breath" to be ported to the Make Controller, but now I need to learn a bit more about writing software for it.

Wednesday, July 08, 2009

Breath-over-IP


The "Breath-over-IP" project is a PHY2PHY project to deliver someone's breath across the Internet. It is based on an Arduino with a double stack of shields. The first shield is a SparkFun Arduino protoshield where I mount some resistors and a solid-state relay. I used wire-wrap sockets to provide a stand-off from the Arduino:

Protoshield with wire wrap sockets

Then on top of that I added an AdaFruit Xport shield, which I populated with a Lantronix Xport Direct:


Stacking Arduino, Protoshield, and Ethernet shield

Arduino, Protoshield, and Ethernet shield

Now I had to build the Breath sensor. I tried using gutted case fans, but they were always a bit too hard to blow. Here I am testing an IR led and IR phototransistor on a breadboard with a gutted case fan:

IR emitter/detector pair and fan

I eventually decided on using a replacement Kestrel anemometer impeller. To provide some kind of structure to mount the IR LED and phototransistor to, I used FastSteel:

FastSteel FastSteel Kestrel Anemometer Impeller Impeller encased in FastSteel

Then I added the side-looking NTE 3029B IR LED (with a 220 Ohm current-limiting resistor off 5V) and NTE 3034A IR Phototransistor detector (with a 10K Ohm pull-up to 5V) held in place with a bit more FastSteel:

Breath Impeller

And for flexibility, I mounted it on a mini-tripod:

Breath Impeller Breath Impeller System

For the "first side" of Breath, I used a solid-state relay capable of AC or DC operation. I figured I might want the Breath to drive a full-sized AC fan, so the "output" is an AC plug. I found a powerful, yet compact AC fan for standard operation. Then I tested it and mounted it in a box:

Breath box in testing

Breath Box


"Home Base" Breath System

I realized that I would be shipping the "other side" of Breath all over the planet, so perhaps it should be a little more compact, and DC only so I wouldn't have to worry about different AC voltages/frequencies in other countries. So I found a powerful 12VDC fan. I mounted the impeller and IR LED and phototransistor into a piece of PVC pipe, and JB Welded the pipe on top of the fan. The pipe is long enough so that the wind from the fan doesn't make the impeller spin, as it is very sensitive! The result:

"Mobile" Breath System

Here is the Arduino program, which used the NewSoftSerial library to talk to the Xport Direct:
#include NewSoftSerial.h

// breath

unsigned long time = 0; // time of last edge
int minTime = 25; // minimum time for edge
int good = 0; // number of consecutive good (fast) edges
int minGoods = 20; // minimum number of consecutive good (fast) edges to indicate breath

int ledPin = 13; // on-board LED pin
int irLedPin = 10; // IR LED attached to pin 12 with 220 ohm resistor
int irDetPin = 0; // IR phototransistor attached to analog 0 with 5V and 10K
int relayPin = 11; // solid-state relay pin

unsigned long onTime = 0; // relay on time'
unsigned long pingTime = 0; // time to "ping" server

int i=0; // counts up received breath packets for diagnostics
int light=0; // whether IR detector sees light or dark
int lastLight=0; // what IR detector saw last time

unsigned long sendTime=0; // last time breath packet was sent out

NewSoftSerial xport(3,2);

void setup()
{
pinMode(relayPin,OUTPUT);
digitalWrite(relayPin, LOW);

Serial.begin(57600);
xport.begin(9600);

pinMode(ledPin, OUTPUT);
pinMode(irLedPin, OUTPUT);
digitalWrite(irLedPin, HIGH);
Serial.print("Starting"); //for debugging
}

void loop()
{
if(analogRead(irDetPin)>850){
light=0;
}
else{
light=1;
}

if(light != lastLight){
// edge
if(millis()-timeminGoods) {
// enough good (fast) edges
digitalWrite(ledPin,HIGH);
if(millis()-sendTime>100){
// send a breath, not too fast though
xport.print("B2");
sendTime = millis();
}
}
else{
// not enough good (fast) edges
digitalWrite(ledPin,LOW);
}

if(millis() - onTime > 100){
digitalWrite(relayPin,LOW);
}

if (xport.available()) {
if((char)xport.read()=='B'){
// receive a breath
digitalWrite(relayPin,HIGH);
onTime = millis();
//Serial.println(onTime);
}
}
if(millis() - pingTime > 1000){
xport.print("A2");
pingTime=millis();
}
}
The last thing needed is a "meet in the middle" server. The two sides of breath send UDP packets to the server. Every second they send a "ping" to make sure the server knows where they are (and this also helps to "punch out" through a firewall). Then when the sides sense a breath, they send a "breath" signal to the server, which relays the breath signal to the other side. Here is the Python program:
from socket import *
s=socket(AF_INET,SOCK_DGRAM) # create UDP socket
s.bind(('[ip address]',[port])) # bind to port
count=0
a1=('10.0.0.0',80) # will hold address of Breath side 1
a2=('10.0.0.0',80) # will hold address of Breath side 2
while 1:
[msg,addr]=s.recvfrom(128) # receive packet of up to 4 bytes
print(addr,':',msg)
if(msg[0:2] == "A1"): # address "ping" from Breath side 1
a1=addr
if(msg[0:2] == "A2"): # address "ping" from Breath side 2
a2=addr
if(msg[0:2] == "B1"): # breath sensed on Breath side 1
a1=addr
s.sendto("B",a2) # relay breath to Breath side 2
if(msg[0:2] == "B2"): # breath sensed on Breath side 2
a2=addr
s.sendto("B",a1) # relay breath to Breath side 1

Monday, July 06, 2009

Dorkbot SoCal 37

Dorkbot SoCal 37

***** Saturday, July 11, 2009
***** 1:00pm
***** Machine Project
***** 1200 D North Alvarado Street
***** Los Angeles, CA 90026
***** Google map of Machine Project

Heather Knight
http://www.marilynmonrobot.com/
A newbie Angelino and recent alumnus from the Personal Robots Group at the MIT Media Lab, Heather is a Social Roboticist who works at the Jet Propulsion Lab. She has two degrees from MIT in Electrical Engineering and Computer Science and a minor in Mechanical Engineering, working in Robotics since 2002 under Professor Cynthia Breazeal. This dorkbot she will present her work enabling robots to understand nonverbal human gestures and talk about the potentials for interactive technology incorporated into everyday objects, such as clothing.


Jody Zellen
http://www.jodyzellen.com/
Jody Zellen is an artist living in Los Angeles, California. She works in many media simultaneously making photographs, installations, net art, public art, as well as artists' books that explore the subject of the urban environment. She employs media-generated representations of contemporary and historic cities as raw material for aesthetic and social investigations.


Xuan "Sean" Li
http://www.way2sky.com/portfolio/
Xuan "Sean" Li creates works that merge concepts and ideas from different disciplines into new digital and electronic expression. He has worked in the areas of web design, game level design, product design, and 3D rendering and animation. His most recent work attempts to expand the role of information visualization as an art form through a novel combination of physical sensors with generative visuals, exploring new aesthetic possibilities by expressing the nature of the wireless data flow.